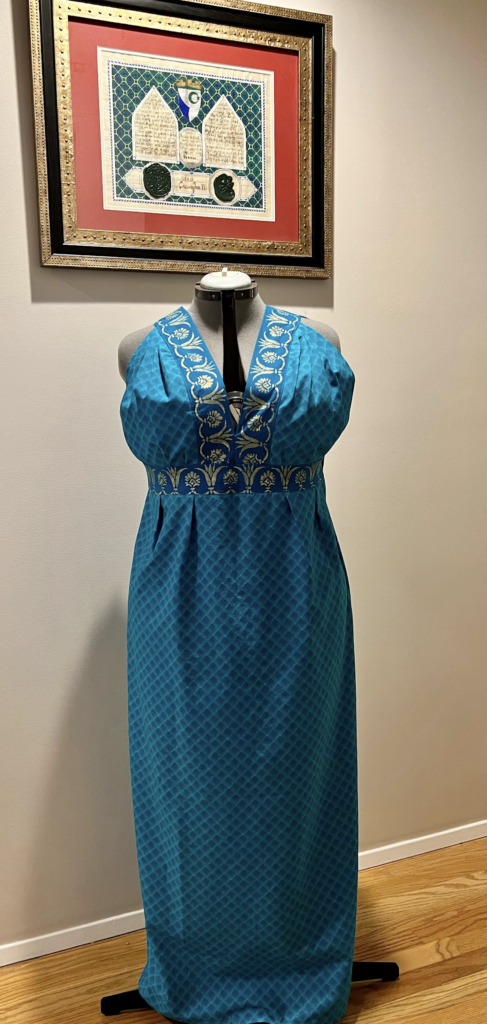
Tailored Egyptian-Style Fitted Dress
(A Tailored Sheath Dress/ Kalasiris with modest coverage)
by : Talia bint-al Athir, OP
Madrone, An Tir

Materials Needed:
1. Cotton or linen fabric: 2.5 to 4 yards (varies based on size and fabric width)
2. Matching sewing thread
3. Two flat hook and eye closures
Required Measurements:
1. Hip circumference at widest point (consider the extra spread when seated)
– For apple shapes, measure at your widest point.
2. Length from underbust to the bottom of the skirt (calf to floor length)
3. Underbust circumference (around the bra strap area)
4. Distance from under the breast, over the shoulder, to the bottom of the bra strap
5. Distance from the center of the underbust (cleavage point) to the side of the breast. Decide how much breast coverage you prefer. Typically the front and back bodice pieces do not meet at the side but you may measure to a mid side point to reduce the amount of skin revealed.
6. Distance from the underbust at the side of the breast to roughly the collarbone
7. Distance from the underbust at the center front to roughly the collarbone
Pattern Pieces:
1. Waistband: Cut 2 rectangular pieces, 3 inches wide by (length measurement #2 + 2 inches)
2. Bodice Strap: Cut 2 rectangular pieces, 5 inches wide by (underbust measurement #3 + 1 inch)
3. Breast Coverage: Cut 8 rectangular/square pieces, each (side breast measurement #5 + 1 inch) by (collarbone measurement #6 + 1 inch)
4. Skirt: Cut 1 rectangular piece, (hip measurement #1 + 1 inch) by (length measurement #2 + 2 inches)
– Optional: Cut 2 skirt pieces, each (half hip measurement #1 + 1 inch) by (length measurement #2 + 2 inches)
Steps for Construction:
1. Assembling the Bodice:
– Sew two breast coverage pieces, right sides together, along the length side, press the seam open, and fold back along that seam to form a rectangle/square. Repeat to make four rectangle/squares.

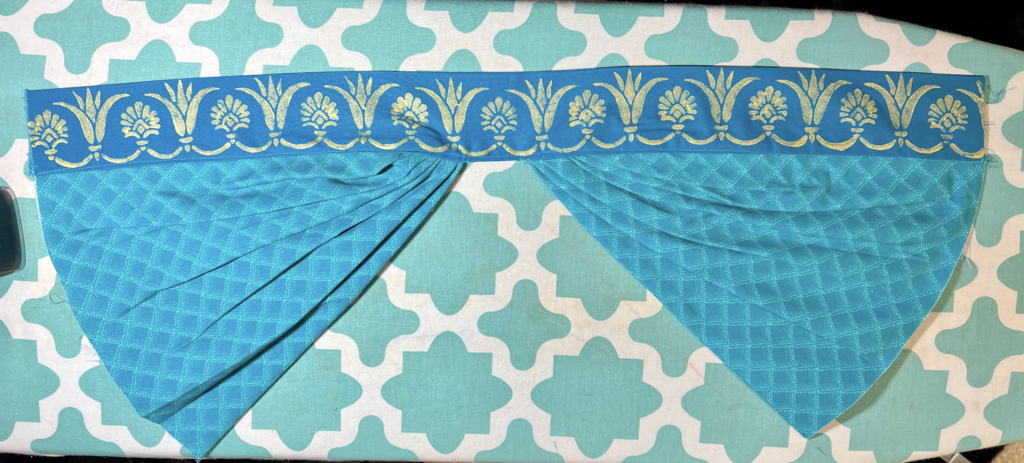
– Pin one square to a bodice strap right sides together, starting from the bottom of the open side or the rectangle/square. Pin 2 inches along the open edge. Mark the strap the length of measurement #7 and pin that point to the diagonal corner from your starting point. Pleat the fabric into a triangular shape for a flat fit and press. Sew the square to the bodice strap.

Pin the mark on the strap to the top left corner Example of pleating under the strap to form triangle
– Repeat for the other end of the bodice strap. Ensure that the pleats fold toward the outside edge (the seam of the rectangle/square).
– Fold and press the bodice strap lengthwise for a smooth finish. Trim excess fabric if necessary. Repeat with the other squares and bodice strap.

2. Attaching Bodice to Waistband:
– Find and mark the center front of one waistband piece.
– Pin and sew one completed bodice strap to the waistband, starting at the center front. Pleat as needed for fit.
– Pin and sew the back part of the bodice strap to the waistband, starting 1 inch from the end. Overlap is acceptable.
– Repeat with the other bodice strap, ensuring they are close or touching at the center front. Do this same process for the back of the straps
– Press seams into the waistband, then press the waistband flat.
– Attach the second waistband piece to the first along the top edge and fold down for a finished look.
3. Attaching Skirt to Waistband:
– Pin and pleat skirt to the waistband, starting 1 inch from the waistband end. Adjust pleats for an even fit.
– Sew the skirt to the waistband and press the seam up into the waistband.
– Fold and sew the bottom of the inner waistband piece for a neat finish.
– Turn the ends of the waistband under ½ inch. Sew each end of the waistband closed. Do not sew each one end to the other. You are finishing the ends of the waistband.
– Sew a back seam from 5-7 inches below the waistband to 12-14 inches above the hem, leaving a slit for ease of movement or you may sew to the end of the length and add a split in the back of the dress for walking ease if needed .
4. Finishing Touches:
– Try on the gown and adjust for fit. Pin and tuck any bulges or irregularities.
– Mark placement for hook and eye closures on the waistband. You may add extra hooks and eyes to keep the upper side opening of the skirt closed if you prefer.
– Hand-sew adjustments, close the open edges of the bodice straps, and attach hooks and eyes.
– Sew the under layer of the waistband closed on the inside.
– Hem the gown by folding under 1 inch and sewing.
– Press the dress, focusing on crisp waistband pleats.
5. Final Step:
– Try on your completed dress and select appropriate accessories to finish this iconic look!
